Setup Guide - Application
In this section you will deploy your own instance of Smart Gate Web Application.
Deploy#
caution
In order to login into your application you still have to deploy server which is described in next section.
Netlify 1-click deploy (Recommended)#
Netlify is a web hosting infrastructure and automation technology company based in San Francisco.
In case of deploying Smart Gate application it assumes usage of Starter plan which is completely free.
More details about Netlify pricing plans you can find here.
It automatically takes predefined Smart Gate configuration and just deploy your site without any further steps ✨
To deploy you application you must have your GitHub account or create new account for free.
Click the button below to deploy your application with predefined template.
After successful deployment you should be able to enter to your newly created page.
The link to your site you will find in Netlify Site overview.
tip
From default your application will have auto-generated site name, but you can change that in Netlify Site settings,
under Site information section.
Custom deploy#
Smart Gate application is just a React web application, so you should be able to deploy it by your own using your preferable methods and services.
Source code of application you will find in repository smart-gate/packages/client.
In order to build package use yarn build command.
Keep in mind that you still have to deliver REACT_APP_API_URL secret ENV for this package in order to establish connection with server.
Check more details in After Server Deploy section.
After Server Deploy#
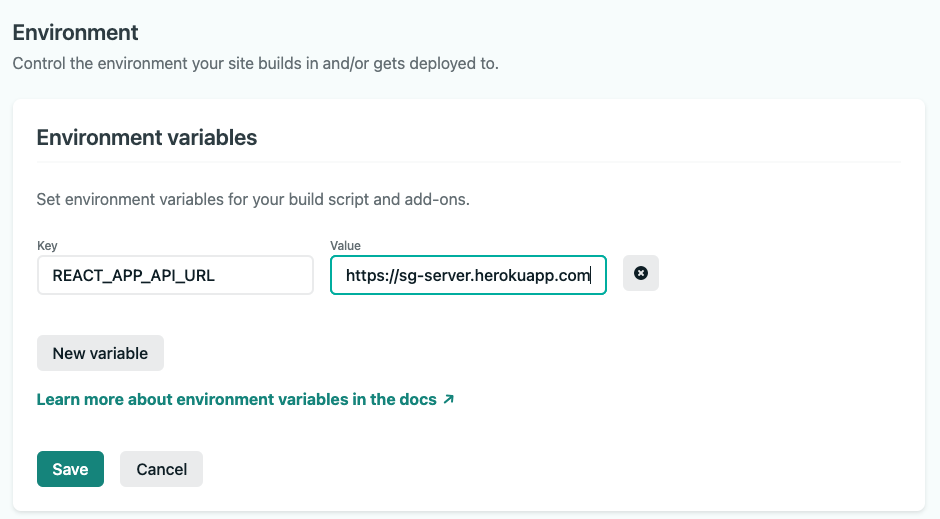
In order to get access to application you also need to provide Server URL for your application. It's required in order to handle connection between server and client.
You can do this by passing REACT_APP_API_URL for your application with deployed server URL.
If you're using netlify just go to the Site settings -> Build & deploy -> environment,
click Edit variables and New variable.

How to add Smart Gate to mobile device home screen (Optional)#
Thanks to the Progressive Web App (PWA) approach in Smart Gate, the application works as something in the middle of standard Web App and Native Mobile apps. In short, it automatically caches content and works in any browser and delivers an option to install the app on your mobile home screen as well as on your desktop.
iPhone or iPad#
- Launch “Safari” app. This does not work from the “Chrome” app.
- Enter into the address field the URL of the website you want to create a shortcut to. Tap “Go.”
- Tap the icon featuring a right-pointing arrow coming out of a box along the top of the Safari window to open a drop-down menu.
- Tap “Add to Home Screen.” The Add to Home dialog box will appear, with the icon that will be used for this website on the left side of the dialog box.
- Enter the name for the shortcut using the on-screen keyboard and tap “Add”. Safari will close automatically, and you will be taken to where the icon is located on your iPad’s desktop.
Android#
- Launch “Chrome” app.
- Open the website or web page you want to pin to your home screen.
- Tap the menu icon (3 dots in upper right-hand corner) and tap Add to homescreen.
- You’ll be able to enter a name for the shortcut and then Chrome will add it to your home screen.
